-40%
JEWELERS SPUR GEAR CUTTING ENGINE DIVIDING HEAD SPIN INDEXER FOR MILLING MACHINE
$ 1584
- Description
- Size Guide
Description
Please read the entire description and if you have any questions do not hesitate to ask. You will have to use a 5/16" hex wrench and a 3/4" socket with universal joint and extension to remove the machine from the base. With the correct tools it goes in and out with no problem.A close friend of mine that lived in Indianapolis manufactured these machines. There were five of them in the beginning and this is number four. The first three were sold to acquaintances of the manufacturer. Serial number five I am keeping for myself so this is the only one that will be available for sale. I acquired a lot of items from his estate and I am handling the sale of this unit for his widow.
First and foremost please be aware that the milling machine is not part of the sale and it’s not included. There are a few smaller items that are also not included that will be detailed below. (T-SLOT MOUNTING HARDWARE)
This machine was set up and tested on a small milling machine at a friends house to demonstrate its use and to see if it would fit on a small
bench top
machine. You can see in the photographs that it fits just fine and works beautifully on the milling machine in the pictures.
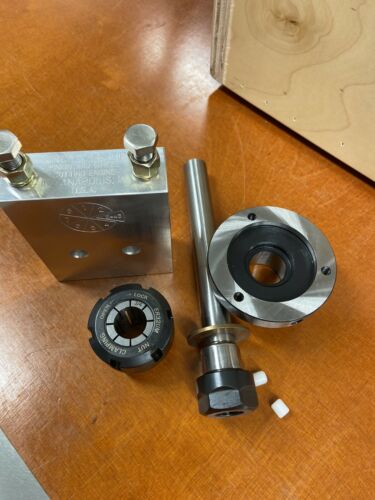
This machine is well designed and has modern accuracy. The spindle and the attachment for the indexing disks are accurate to .0003”. The spindle comes with a complete set of ER-20 collets (1/16"-1/2") and the tools to tighten the collets in the spindle. It also comes with the tools to tighten the 3/4 inch collet on the tail end of the spindle shaft. These collets allow the machine to hold a wide range of tool shaft diameter‘s. From 1/16” to 1/2”.
This machine comes with a complete listing of the index circle numbers and locations. It also has a factor chart to aid in selecting a circle of holes to get a desired amount of divisions for your work. The disks are labeled A, B, C, and D so that you can easily and quickly find the correct circle of holes. If you look closely at the photographs you can see a neat feature of this machine. The machine has a small LED that is illuminated by pushing on a
micro-switch
. This switch is positioned directly under the correct circle of holes that you are using to create your divisions. If you accidentally put the brass pin in the wrong circle of holes and index it it will not activate the switch and illuminate the LED light. There is also a brass sector guide that shows you the location for the indexing pin for your next division.
There are two large indexing disks that come with the machine. Each one of these is double-sided and contains 17 circles of holes on each side for a total of 68 circles of holes. This allows for direct indexing for 41-108 divisions. This machine is capable of creating between 2 and 108 divisions. This also includes every prime number from 3 to 107.
EACH ONE OF THESE DISKS HAS AROUND 2300 HOLES !
Installation and workflow of the machine is as follows----
Mount the main spindle housing on the table of your milling machine using 2 T-nuts and bolts(not included)
Insert the main spindle assembly using the two large bronze thrust washers.
Then install the flange disk holding assembly on the tail end of the spindle shaft. This is tightened onto the shaft with the collet and kept tight on the shaft with a wave washer and socket head cap screw. When finished with this assembly there should be a small length of the shaft left to pilot the disks on. For concentric accuracy the disks are piloted on the spindle shank through a precision ground hole.
Now select a disk with the appropriate circle of holes and install this onto the flange using the three stainless steel flat head screws.
Next install the aluminum indexing assembly onto the table of your milling machine. There is a small divot in the middle to clear the bolt assembly in the center of the disk. Center this divot under the bolt in the center of the disk and then lock the toggle clamp onto the disk.
When this assembly is locked onto the disk go ahead and tighten your fasteners into the table of your milling machine.
Now select the appropriate sized ER-20 collet and mount in the spindle. Then install your tooling shaft and tighten with the included tools.
Now insert one of the three brass stop pins into the first hole for your operation. Rotate the disk so the pin goes down into the slot in the brass switch slider. Please note that you may have to adjust this to get the slot lined up with the circle of holes that you are using.
Next adjust the brass sector guide for the correct hole count for the number of operations that you are performing. Once this is done you can then remove the pin from the first hole which will turn off the green light and then install this pin in the next hole for the next indexing position.
Once again for clarity the milling machine is not part of the sale and none of the hardware that is used to attach the machine to the mill table is included. You must provide your own hardware for this because the T-slots are different and will vary from one machine to another. You also have to provide your own threaded tooling shafts. The one that is seen in the photographs holding the small brass test gear is included. These shafts are frequently manufactured by cutting the head off of a large shoulder bolt with the correct diameter.
This DOES come with the R-8 tool spindle and a brand new set of eight gear cutters. These cutters are module 1 with a 20° pressure angle.
If you look at the pictures you can see that the two heaviest objects are bolted to the bottom of the wooden box with nylon spacers to prevent scratching. They are bolted down with nylon stop nuts so they will not vibrate loose during transit. All of the other parts are bagged with desiccant packs and sealed tightly. All of the tools are individually wrapped to prevent scratching. Also all of the collets and other small individual pieces are all individually wrapped to prevent scratching or any other type of damage.
You will have to use a 5/16" hex wrench and a 3/4" socket with universal joint and extension to remove the machine from the base. With the correct tools it goes in and out with no problem.
This is well packed in a large double wall cardboard box and will be insured for its full value. It will be mailed by priority mail and will require a signature due to the level of insurance. This unit is already packed up and ready to mail so if you pay by noon Eastern time I will mail at the very same day !


